Friday, December 9, 2011

Personalized Art Set

My daughter loves to draw and paint so every year I've started giving her an art set. The ones at Michaels serve the purpose ($3.99 when on sale). I decided last year to personalize the set by covering it with scrapbook paper and Mod Podge. It's a very simple way to dress it up. I also buy the notebook and cover it to match. I just finished the set for Olivia this year. Makes for a nice kid's birthday gift too. And you will have less than $10 in it total!

 Another idea is to cover a clipboard with scrapbook paper and Mod Podge. Olivia uses this one to do her homework sheets on.

Wednesday, December 7, 2011

Cabinet Door Serving Tray

I've been wanting to do something with a cabinet door for a while and finally got my inspiration on Pinterest. Someone had taken a cabinet door, stenciled it and used it for a serving tray. I decided to use...you guessed it, scrapbook paper and Mod Podge instead. I found this door at Habitat Restore for $4. 
In the paint section of Home Depot they have what's called "oops paint" that people return. You can find some really good deals! I found this sample paint for $1.50 and thought I'd try it. After painting a few coats on the door I used Mod Podge to glue the scrapbook paper to the recessed area of the door. Once it was dry I covered the paper with several coats of Mod Podge, allowing dry time between each coat. I always apply Mod Podge with a foam brush and even applied the paint with one as well. I spray painted these old drawer pulls and drilled holes on each end to install them (they come with the screws you need). 
And here's the finished product! I'm so excited about this one!! I have it on our end table in the living room right now for a pop of color. 

Kids Table and Chairs

We've had this table and chairs from Ikea for a while. When we purchased it we painted it white. I decided the other day to add some color to it with scrapbook paper. I cut the pieces to fit the back slats on the chairs. Then used Mod Podge to glue the paper to the chair. Once it was dry I put two more coats of Mod Podge on top. I used the same paper that I covered the soup can with. Very cute and super easy!


Chalkboard Trays

I found these great silver trays at Dollar Tree. Using chalkboard paint found at Michaels for $.89 I painted the inside of the tray. First I outlined the edge with a small craft brush then used a foam brush for the rest. I found that doing a few coats in different directions worked best. Once it was dry I hot glued a bow on the top. The bow can be changed out with the holidays or to match your decor. I have my tray on an easel in the foyer with "Merry Christmas" written in chalk. Later I'll change the bow and write "Welcome". You could also display it in the kitchen with the weekly dinner menu.


Friday, November 11, 2011

Mixed Media Art

I am no artist, but decided to try my hand at making a mixed media piece. I found this great acrylic craft paint at Hobby Lobby that comes in metallic colors. I used Worn Penny to paint the canvas with. Then the kids and I went outside and found a few tree branches. I used needle and thread to sew and secure the branch to the canvas. Never really thought about stitching on canvas but it totally worked! I have this old dictionary and I cut out pages in the shape of leaves. Next I used (you guessed it) Mod Podge to glue the leaves to the canvas. Another layer of Mod Podge on the top sealed the paper. Across the bottom I used torn dictionary pages with the definitions of beautiful, creation, earth and faithful. I painted a thin layer of paint over the pages on the bottom. I had a few Scrabble tiles that I hot glued down the side to spell "Nature". Maybe I'll get better over time but I loved the finished product and it was perfect for my half bath.


Sunday, November 6, 2011

Recycled Pringles Can

This week at MOPS our guest speaker spoke on budgeting. We also talked about the importance of teaching our kids how to save, give and spend appropriately. The craft we did was to make your own piggy bank. Since we operate on a budget at MOPS I try to keep the crafts to $1 per mom. Kroger was running a sale on Pringles so I stocked up on 50 cans. This was an interesting sight! I emptied each can and put the chips in Ziploc bags for the moms to take home, then washed out the cans. We used scrapbook paper and Mod Podge (love the stuff!) to cover the cans. We embellished with stickers and ribbon and cut a slit in the lid for the change. I decorated my bank with Disney stickers since we're saving for our Disney trip in February. Another idea for the Pringles can is to fill it with cookies and give at Christmas.

Chicken Wire Art Frames

I came across this idea on Pinterest and thought it was so cute! Every day the kids come home with art work and I don't have a place to display it all. I've made the mistake of throwing away some of my daughter's work only to have her dig it out of the garbage and ask me with such a sad face why I threw it away. Well here's the solution to my problem. Plus I love to find old treasures at yard sales and Goodwill so it was the perfect project for me. I gathered a bunch of frames in various shapes and sizes and removed the glass and picture. Then I spray painted them all the same color. Since they are going in the kids playroom I chose orange.
I then cut chicken wire to fit each frame and stapled it to the back. Since I wasn't sure if the wire would scratch the walls I covered it with duct tape.
Here's the finished product. It was an easy weekend project. The kids are so excited to have their artwork on display. The lamp in the picture was a fun art project I did with the kids. We took a plain lampshade and hot glued buttons on it. You can't see the from this picture but the playroom has polka dots on the walls so it went perfect with our theme.


Sunday, October 23, 2011

Frame from an old window

I found this old window at an antique store and painted it black. I didn't even sand it because I wanted the rugged look. I have terrible handwriting so I found a font I liked and printed off the "G" on the computer. Holding it behind the glass I traced it using a black paint pen. I'm still trying to decide if I want to put black and white pictures in the panes or some fun fabric. Any thoughts?

Hand Sanitizer

Everyone uses hand sanitizer but it's not always pretty. This is another simple craft we did at our last MOPS meeting. All you do is peel the label off a $1 bottle of hand sanitizer and replace it with stickers. Embellish with ribbon and buttons. It would make a great teacher gift. You can even monogram it with a paint pen. Simple, inexpensive and fun!

Bathroom Storage Cubby

We saw this neat idea on HGTV where you can build a storage cubby between studs in the wall. So there's this wall in our master bathroom and we decided to see what was behind it. Well as it turns out it was just empty space. What a waste! After deciding how large we wanted to make the cubby we cut out a hole in the wall. Then Jason made a "box" out of plywood and created shelves. He installed the box in the hole in the wall (don't ask me how he did this, I just come up with the ideas). Anyway, we painted and trimmed out the cubby with molding. 
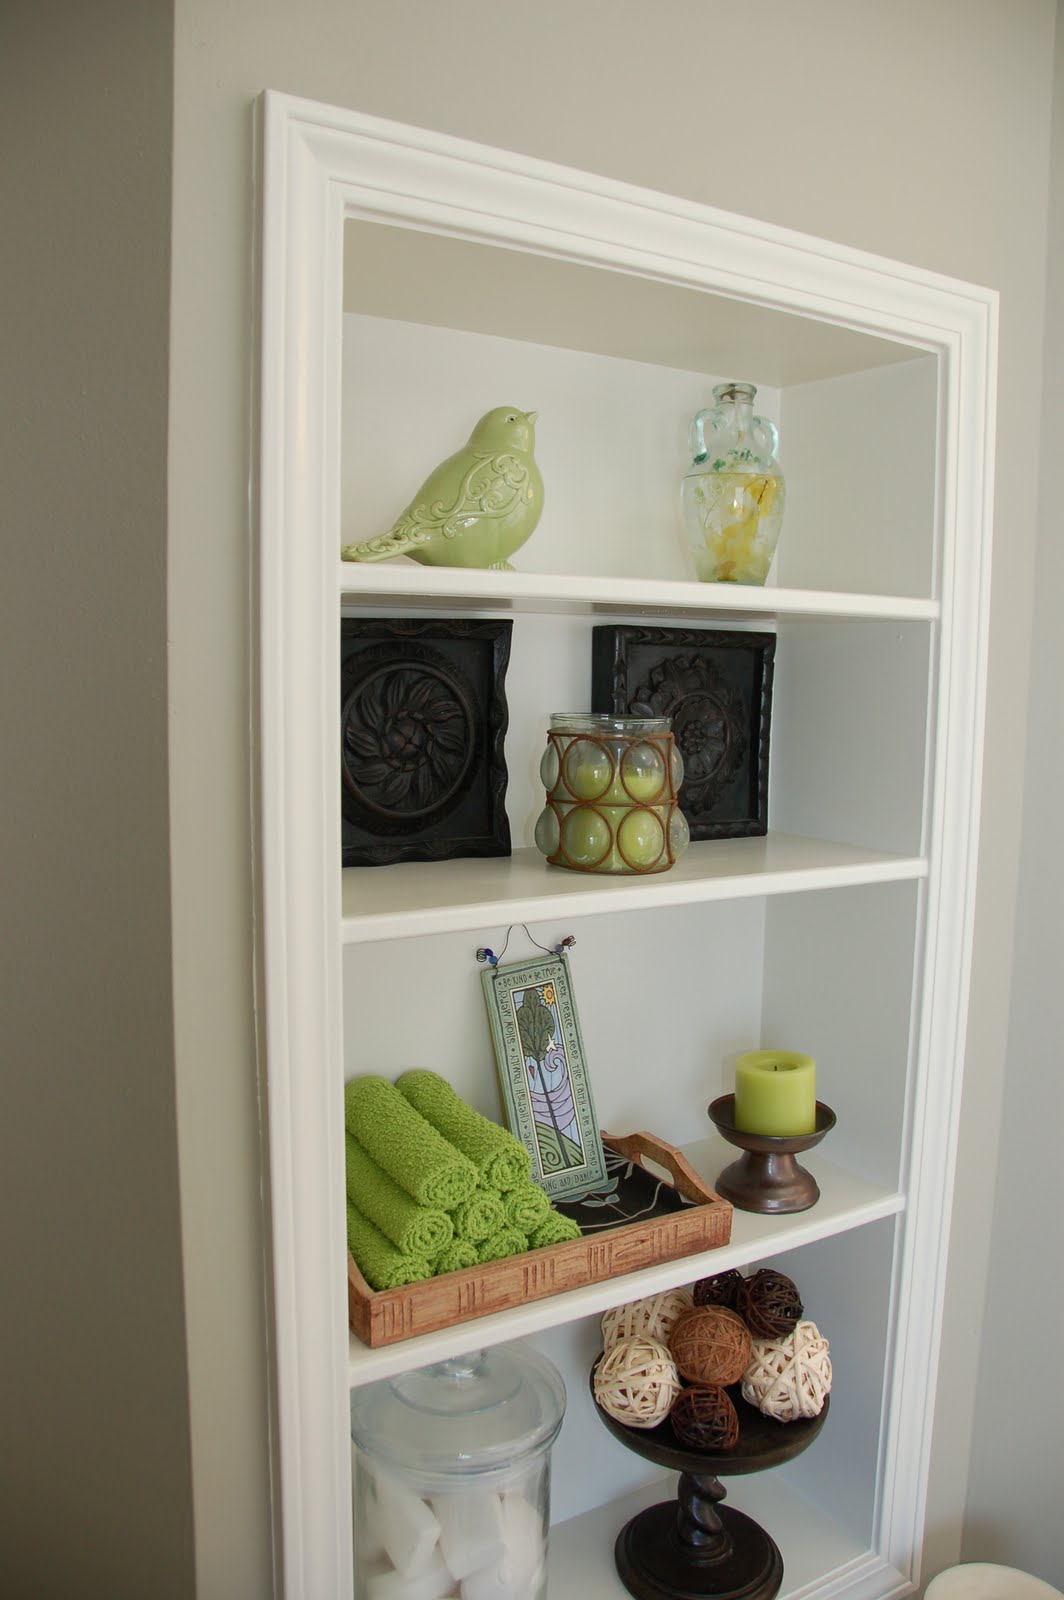
Here's the finished product. I love having the extra space to store things or decorate. Saw the idea of storing soap in the apothecary jar in a magazine. I love how it all turned out!

Friday, September 30, 2011

Photo Boards

I saw this on a blog and loved it so I made a few for myself. I purchased the boards at Michaels. I painted the back and edges of the board either black or brown depending on the color scheme. Next I cut scrapbook paper to fit the area I wanted covered. I used Modge Podge to glue the paper and picture to the surface. File the edges of the paper with a finger nail file until it's even with the edge of the board. Once the Modge Podge was dry I covered the entire surface with Modge Podge using a foam brush. Then decorate with buttons, ribbon, etc. Here are a few of the ones I made.

Craft Projects

My role as Creative Activities director for our local MOPS (Mother of Preschoolers) group challenges me to come up with crafts on a budget for our moms to do. Here are a few of the crafts we've done. I'm always searching blogs and Pinterest for new ideas.

Beaded Silverware
I purchased the serving pieces at the Dollar Store. We used pre-cut floral wire from Michaels and threaded the beads on the front side only. On the back you just twist the wire so it will hold. Needle nosed pliers made the twisting easy. They do have to be hand washed because eventually the wire will rust. Makes for a cute gift when you take a meal to a friend! Washer Necklaces
These were a huge hit at MOPS! The washers were super cheap at Home Depot/Lowes. I used scrapbook paper and traced a circle around the outside edge of the washer and the inside circle. Cut out the circle with scissors. I was able to cut out the inside of the circle by using and exacto knife. Glue the paper to the washer using E6000 industrial glue found at Michaels/Hobby Lobby. Make sure the glue is spread out evenly (use a q tip if necessary). Once the glue has dried take a finger nail file and file the edges of the paper so it's even with the washer. Other blogs suggested using Diamond Glaze on top of the paper and washer but I couldn't find it so I used Modge Podge Dimensional Magic. It works the same way and gives you a hard finish on the surface. It's self leveling to just squeeze a little bit on top of the paper and work it around the surface. If there are any bubbles use a tooth pick to pop them. Let the Modge Podge dry overnight lying flat. We just used black twine for the necklace and a twist clasp. There are so many possibilities with this necklace!
Magnets
Another super easy craft are these magnets. My 5 year old daughter even enjoyed doing this with me. All you need are those clear marble vase fillers that have a flat side and scrapbook paper. Cut the paper to fit the marble and glue using any clear drying glue. I used Tacky Glue. Affix a magnet to the back and you're done! Here's a picture of the clear marble, magnet strip and finished products.
Scripture Memory Cards
If you haven't noticed, I love using scrapbook paper. It's inexpensive and fun! For this craft we cut scrapbook paper to fit the back side of index cards. Glue the paper to the index card using Tacky Glue. Punch a hole through the index card and bind together with a ring holder (not sure if that's the technical name for it). On the index side of the card we wrote scripture verses to memorize. It's small enough you can keep it in your purse of car.

Tuesday, June 21, 2011

Weekend Projects

Another weekend project of ours was cleaning up the area around the AC units. Before we had pine straw around the units but found that the straw and dust getting in the units caused them to be inefficient. So we decided to replace the straw with rocks. First we lined the area with landscape fabric. Next we used metal edging around the units to contain the rocks. Much neater and hopefully the units will last longer.
The area around the garbage can was next on the list. Pine straw was here as well but became a muddy mess every time it rained. So out with the straw and in with concrete pavers. The garbage can is much easier to roll out now and without all the mess.

Installing Rain Barrels

Since we love working in the yard just as much as inside the house we decided to install rain barrels. Every time it rains they fill up and we use the water for our plants and flowers. Eventually we plan on having a garden and they will come in handy then as well.

So if you know my husband, we couldn't just put the rain barrels on the ground and be done with it. We cleared out the area where they were to go and covered it with landscaping fabric. Then we built a "platform" for each barrel using concrete pavers. In our case it all had to be level :) We elevated one barrel so that once it's full it will spill over to the next barrel.
Next we covered the landscape fabric with egg rock. The first barrel is attached to the down spout on the house. We purchased a hose online that connects the two barrels. We also purchased a diverter that connects to the downspout and the first barrel. It senses when the barrels are full and diverts the water into the yard. Pretty cool and saves a tremendous amount on the water bill. Now all we need is for it to rain!

Sunday, March 27, 2011

Completed Master Bathroom

Finally!!! The vanity and tub have been finished for a while now, but we've been saving up for the shower glass. With all of this renovation it was very important to us to pay cash and not incur a lot of debt. So a year without a shower was a small price to pay. The glass was installed last week and we have been so happy with it!! I love the river rock floor and it doesn't hurt my feet. I've had lots of people ask me about that. Here are a few pictures of the finished product.I love the natural sunlight coming in but couldn't risk giving the neighbors a peep show so we frosted the window. At first we used this spray on frost but soon learned it didn't hold up when it got wet. So we ended up using the frosted window film which was surprisingly easy to install. It works like a charm!The vanities turned out great as well. I'm so thankful we decided to take down the extra large, cover the entire wall mirror and replace it with individual mirrors. I found these at Walmart for $35 each which was a steal! My next project is to find an old vanity stool to paint and recover. I've hit just about every antique store in the area.

Friday, March 25, 2011

Kitchen With New Lights

The last thing we had left to do in the kitchen was change the florescent lights and move a light. Well, we waited and waited while Jason educated himself on electrical work until I finally convinced him to hire someone. It was the BEST decision!! They were in and out in a day and no one got hurt. We (or should I say I) have learned that anything having to do with plumbing or electrical needs to be left to the professionals.This is the before with florescent lights. We replaced them with can lights (which I LOVE) and moved the other light. We needed one centered over our table. And here's the after...

Winterize Your Home

I haven't updated our blog in forever! Over the winter months we took a little break from renovations. There were a few things we did to help insulate the house. Jason caulked just about everywhere he could. He insulated the garage door by using construction foam glue to glue XPS Rigid Foam Board insulation to the door. You would be surprised at how much cold air was coming in through the laundry room via the garage. If you decide to do this on your own I will say that the insulation added weight to the garage door and it wouldn't open. We had to call the company and have them come out to re-calibrate the door. Not a big problem but definitely not expected. So you can learn from our mistakes!We added weather stripping to the bottom of all the exterior doors. This helped with the cold draft.
The change that made the biggest impact was in our master bedroom closet. We noticed that it was extremely cold this winter. On each side of the closet we have these little doors that lead to extra storage. Jason noticed that the storage areas weren't insulated and were on the exterior of the house. So he insulated the storage areas and added lights. Eventually we will sheet rock and carpet the space so we can store totes and luggage in it. But for now the insulation was a HUGE help. Our closet is no longer freezing cold!
One last change we made was to the attic door in Olivia's bedroom. Don't have a clue why they would put the access to the attic in a bedroom, but oh well. We noticed that her bedroom was colder than the others so Jason decided to try insulating the door to keep heat from escaping.
He used 1x4's and plywood to build a "box" inside the attic door. To enter the attic you simply push the box up. It's attached with piano hinges. The box is insulated with batt insulation on the attic side and XPS insulation around the 2x4 frame that it sits on. He sealed where those two meet with foam weather stripping.