Wednesday, October 21, 2009

Removing Hardwood Flooring

I have yet to talk about the nightmare of removing the hardwood in the foyer, 1/2 bath and kitchen. The genius builder assumed that no one would EVER want to remove the hardwood and therefore glued it to the subfloor. Since the hardwood is engineered we could have sanded and stained it (but there's a limited number of times you can do this over the life of the flooring), keep it as is (previous owners let their pets urinate on it so that was out of the question) or try to replace it. We found a great deal on 5 inch, handscraped hardwood at the Home Depot outlet in Atlanta so we're putting that everywhere but the bedrooms upstairs.

I pray you will never have to deal with this but just in case I'll tell you how we're removing it. First we set the circular saw to the depth of the hardwood and cut the entire floor into squares. This makes it easier to get up. Then we're using a heat gun (looks like a hair dryer but puts off much more heat) to heat the squares and loosen the glue. My father in law created this tool that connects to the air compressor and we're using it to pry up the squares. I'll have to take a picture of it for you but it's similar to a jack hammer.

At first we were using brute force (crow bar and hammer) to get the floor up but were damaging the subfloor. We need the subfloor to be intact for the other hardwood installation. We did hire someone to get the kitchen up because we have so much more to work on ourselves. But we're doing the foyer and 1/2 bath.

Oh and one pointer...the heat gun gets VERY HOT so don't accidentally bump your leg with it like I did. The result will be a 3rd degree burn!! I've been to the doctor and am taking antibiotics so it's healing well. Home renovation can be dangerous :)

And this is what's left of the kitchen.

Monday, October 12, 2009

Priming With a Sprayer

It's amazing how much one can get accomplished without kids...and working together. We've had two weekends in a row with grandparents in town and we've done nothing but work on the house. We are so excited about all we got done! Within a few hours we were able to prime most of the rooms with our paint sprayer. That thing rocks!! Here's a picture of the master bedroom. It was the first room we primed with the sprayer and had to figure out the technique.
The prep work is the most time consuming part. You have to tape off everything you don't want covered with overspray. But overall it's a lot faster. We also sprayed the first coat of paint on the ceilings (Benjamin Moore Ballet White). This will be used for our trim as well.

It's starting to feel like our home now that we're covering up the old paint. I can't wait till we get that very first room painted. So check back with us.

Thursday, October 8, 2009

The Little Things

These are all the little things we've done that no one will probably notice. Since we're not living in the house yet we thought we'd go ahead and do them now rather than later. The silver threshhold that no one pays attention to...I spray painted black. It was super easy and looks so much better. All I did was tape off the door trim.

Some of the stack stone on the porch had fallen off. Liquid nails did the trick!
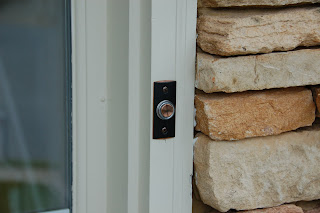
And a new door bell. The old one was brass and I would have tried to spray paint it (duh) but it was broken.

The Joys of Scaffolding

This past weekend we (actually Jason and his dad) patched the hole left in the ceiling from mold. There was a roof leak which caused mold when it wasn't fixed. We had the roof leak repaired and then patched the ceiling. I was all for hiring someone to do this but Jason's dad conveniently had scaffolding that could reach our 20 foot ceilings. Go figure! I actually climbed on this and about freaked out. We'll also use it to paint, take down the fan and blinds. So if ever in need of scaffolding we've got it :)

Tuesday, October 6, 2009

Spray Paint Cabinet Knobs

Ok so I'm officially addicted to spray paint! I saw this idea and have gone crazy with it. I'm spray painting the brass knobs that were on the cabinet, light fixtures, even toilet paper holders. Eventually we'll replace these things but for now this will work. So what I did was use steel wool to rough up the knobs and take off the shiny finish. Then I sprayed about 3 coats of paint (oil rubbed bronze) and 2-3 coats of clear. Be sure to cover up the place where the bulb screws in. I'm even going to spray the chandelier in the dining room.

Believe it or not but Rust-oleum makes an oil rubbed bronze. I originally used a hammered dark brown spray by Rust-oleum and it looked really good but I came across this at Lowes. It's what I originally wanted so I just sprayed right over what I had already done. It looks like the real thing!

And here's the finished product. You've seen these in brass. Ours was so rusted! I did take out the glass before painting it.

Backsplash and cabinet lighting

Demolition is fun, especially when taking out this tile backsplash. I learned to always wear safety goggles and long sleeves (many cuts later). Once the counter tops are replaced with granite we'll install a new backsplash. Since it was tiled directly onto the sheet rock there were some holes that we'll patch before installing our tile. Hopefully the patching will work and we won't have to install new sheet rock or backer board. Fingers crossed!
And if you can overlook the mess, Jason installed under the cabinet lighting. Don't ask me how but he figured out a way to do this with no prior experience. Yay wonderful husband! It's all connected to a switch. We've picked out trim to put under the cabinets to conceal the lighting. Trim is art and I now have an appreciation for those who design and piece together molding. After pouring over cabinet catalogs we found something we liked and copied it. I'll post pictures when we get to that stage.

Attention to Details

Gotta love my husband and his attention to detail! He insists on patching every hole and blemish on the walls before we prime and paint. So just imagine this all over the house...lots of mudding and sanding going on. This will be the playroom. It had an ugly wallpaper border that I took down. Wallpaper is evil! You can also see the kitchen cabinet doors in the picture. We're priming those with oil based paint and plan to paint and glaze them. I'll show more about this project when we start.

Mudding

Mudding is a messy job! Thankfully we had our friend Trey help us out. This is where the french doors will go to enclose Jason's office. Looks so different with a wall there. And below is the other door with transom.
One of our favorite places to find good deals is the Habitat for Humanity Restore. We found both transoms there for $3! And the french doors were $25 each instead of the $100 we would have paid. The desk that's in the picture above was purchased there. It's a project for later but we plan to paint it black and distress it.

Monday, October 5, 2009

Framing a Door

View from the other side of the office. Jason had to frame in this door as well.

Framing

When you first walk into the house there's a formal living room to your right. We decided to enclose this area so Jason can have an office. We took down the banister on that side and will build a wall with french doors. I'll post a few more pictures to show you what it looks like now. Bless his heart, it's taken him weeks and he's finally at the mudding stage. This was a learning experience for him and I think dealing with the transoms above the doors was a pain. I'm so proud of the work he did though!

Priming the Subfloor

Sorry if I'm skipping around but I'm trying to get this up to date with all we've done. This gives you an idea of the prep work involved with the floors. After removing the carpet we took up all the tack strips and staples (which took forever because I did it myself), cleaned the floors, and rolled on primer. We have hardwood that will be installed later. You might be asking why we are doing so much prep work to the floors. Well if our dogs were to smell what their dogs did to the carpet then they would do the same thing. So we're taking every precaution to make sure that doesn't happen.

Exterior After Pictures

The biggest change to the house occurred when we had it painted. It took forever to decide on paint colors (we were so scared) but we love the final result. We used Portelas Painting and they were great to work with. They were also the ones who fixed the wood rot. Cutting down the trees made a huge difference and you can actually see the porch now. The colors we used were Sherwin Williams Stone Lion (main color), Canvas Tan (trim), Chateau Brown (shutters) and Sommelier (door).

Landscaping

After cutting the grass we discovered a beautiful yard! Who would have thought? The previous owners had done some landscaping so we can't take credit for it all. But for those of you who know our love for gardening you know we have big plans for it. Our main plan at this point is to get rid of the crab grass and weeds that have taken over. I'll leave that to my husband :)

Sunday, October 4, 2009

Carpet

Found this picture of the carpet and had to share. Gives you an idea of what it looked like before we took it all out. I mentioned earlier that we primed the subfloors. Basically, we cleaned every square inch of the floors and rolled an oil based primer on to seal out any smells.

Mailbox

Speaking of wood rot, check out the mailbox. Jason completely rebuit and painted it so we wouldn't be in voilation of our neighborhood covenants. Within a week of fixing the mailbox, two-that's right-two of our friends backed into it!! Now it's in concrete so it shouldn't go anywhere.

Window Rot

The exterior windows had some serious wood rot. We hired this out for repairs. Most of the window trim was replaced with pvc and some of the columns on the front porch had to be replaced as well. The rot is a result of the trim not being painted over the past 10 years.

Thursday, October 1, 2009

The deck

Jason pressuring washing the deck. If we have any hopes of salvaging it we needed to clean and stain it. Eventually we hope to add on and build a screened in porch (that's in the 5 year plan LOL). Now if it will ever stop raining we can stain it.

Front Steps Drain System

The front steps were about to collapse because the ground below had washed away. My husband and father in law back filled under the steps with concrete and put a drain in. This was about a day's work but hopefully it will take care of the problem. Below are pictures of the before and after. The drain system uses a pvc pipe to help the water run under the steps then away.

Interior Before Pictures

Here are some more pictures of the interior. Our plan is to repaint everything from floor to ceiling. We even primed the subfloor once the carpet was out because they had pets that frequently used the bathroom inside (hence the horrible smell). Mainly there are a lot of cosmetic changes we want to make but love the layout.